Use Embedded Cluster
This topic provides information about using Replicated Embedded Cluster, including how to get started, configure Embedded Cluster, access the cluster using kubectl, and more. For an introduction to Embedded Cluster, see Embedded Cluster Overview.
Quick Start
You can use the following steps to get started quickly with Embedded Cluster. More detailed documentation is available below.
-
Create a new customer or edit an existing customer and select the Embedded Cluster Enabled license option. Save the customer.
-
Create a new release that includes your application. In that release, create an Embedded Cluster Config that includes, at minimum, the Embedded Cluster version you want to use. See the Embedded Cluster Release Notes to find the latest version. Replicated recommends that you update the version frequently to ensure that you are using the latest version of Embedded Cluster.
Example Embedded Cluster Config:
apiVersion: embeddedcluster.replicated.com/v1beta1
kind: Config
spec:
version: 2.13.3+k8s-1.33 -
Save the release and promote it to the channel the customer is assigned to.
-
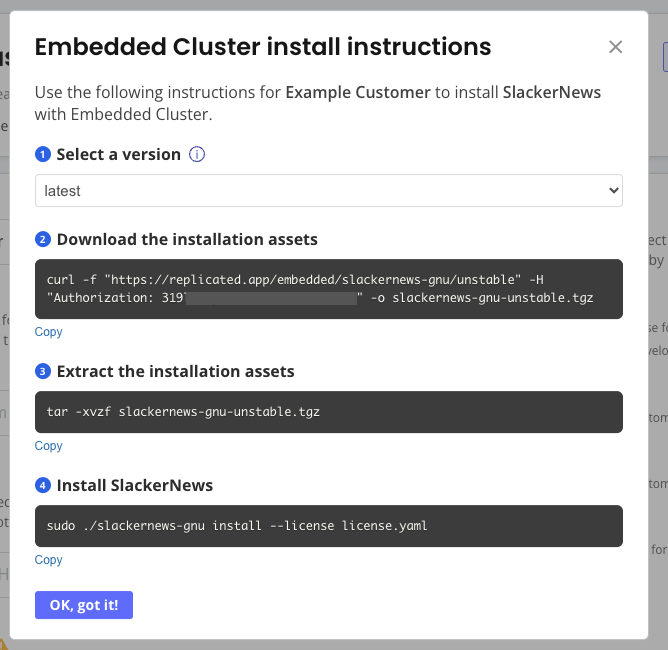
Return to the customer page where you enabled Embedded Cluster. At the top right, click Install instructions and choose Embedded Cluster. A dialog appears with instructions on how to download the Embedded Cluster installation assets and install your application.

-
On your VM, run the commands in the Embedded Cluster install instructions dialog.
-
Enter an Admin Console password when prompted.
The Admin Console URL is printed when the installation finishes. Access the Admin Console to begin installing your application. During the installation process in the Admin Console, you have the opportunity to add nodes if you want a multi-node cluster. Then you can provide application config, run preflights, and deploy your application.
Access the Cluster
With Embedded Cluster, end users rarely need to use the CLI. Typical workflows, like updating the application and the cluster, can be done through the Admin Console. Nonetheless, there are times when vendors or their customers need to use the CLI for development or troubleshooting.
If you encounter a typical workflow where your customers have to use the Embedded Cluster shell, reach out to Alex Parker at alexp@replicated.com. These workflows might be candidates for additional Admin Console functionality.
To access the cluster and use other included binaries:
-
SSH onto a controller node.
noteYou cannot run the
shellcommand on worker nodes. -
Use the Embedded Cluster shell command to start a shell with access to the cluster:
sudo ./APP_SLUG shellWhere
APP_SLUGis the unique slug for the application.The output looks similar to the following:
   __4___
_  \ \ \ \   Welcome to APP_SLUG debug shell.
<'\ /_/_/_/   This terminal is now configured to access your cluster.
((____!___/) Type 'exit' (or CTRL+d) to exit.
 \0\0\0\0\/  Happy hacking.
~~~~~~~~~~~
root@alex-ec-1:/home/alex# export KUBECONFIG="/var/lib/embedded-cluster/k0s/pki/admin.conf"
root@alex-ec-1:/home/alex# export PATH="$PATH:/var/lib/embedded-cluster/bin"
root@alex-ec-1:/home/alex# source <(k0s completion bash)
root@alex-ec-1:/home/alex# source <(cat /var/lib/embedded-cluster/bin/kubectl_completion_bash.sh)
root@alex-ec-1:/home/alex# source /etc/bash_completion
The appropriate kubeconfig is exported, and the location of useful binaries like kubectl and Replicated’s preflight and support-bundle plugins is added to PATH.
-
Use the available binaries as needed.
Example:
kubectl versionClient Version: v1.29.1
Kustomize Version: v5.0.4-0.20230601165947-6ce0bf390ce3
Server Version: v1.29.1+k0s -
Type
exitor Ctrl + D to exit the shell.
Reset Nodes and Remove Clusters
This section describes how to reset individual nodes and how to delete an entire multi-node cluster using the Embedded Cluster reset command.
About the reset Command
Resetting a node with Embedded Cluster removes the cluster and your application from that node. This is useful for iteration, development, and when mistakes are made because you can reuse the machine instead of having to procure a new one.
The reset command performs the following steps:
- Run safety checks. For example,
resetdoes not remove a controller node when there are workers nodes available. And, it does not remove a node when the etcd cluster is unhealthy. - Drain the node and evict all the Pods gracefully
- Delete the node from the cluster
- Stop and reset k0s
- Remove all Embedded Cluster files
- Reboot the node
For more information about the command, see reset.
Limitations and Best Practices
Before you reset a node or remove a cluster, consider the following limitations and best practices:
-
When you reset a node, OpenEBS PVCs on the node are deleted. Only PVCs created as part of a StatefulSet are recreated automatically on another node in the cluster. To recreate other PVCs, redeploy the application in the cluster.
-
If you need to reset one controller node in a three-node cluster, first join a fourth controller node to the cluster before removing the target node. This ensures that you maintain a minimum of three nodes for the Kubernetes control plane. You can add and remove worker nodes as needed because they do not have any control plane components.
-
When resetting a single node or deleting a test environment, you can include the
--forceflag with theresetcommand to ignore any errors. -
When removing a multi-node cluster, run
reseton each of the worker nodes first. Then, runreseton controller nodes. Controller nodes also remove themselves from etcd membership.
Reset a Node
To reset a node:
-
SSH onto the node. Ensure that the Embedded Cluster binary is still available on the machine.
-
Run the following command to remove the node and reboot the machine:
sudo ./APP_SLUG resetWhere
APP_SLUGis the unique slug for the application.
Remove a Multi-Node Cluster
To remove a multi-node cluster:
-
SSH onto a worker node.
noteThe safety checks for the
resetcommand prevent you from removing a controller node when there are still worker nodes available in the cluster. -
Remove the node and reboot the machine:
sudo ./APP_SLUG resetWhere
APP_SLUGis the unique slug for the application. -
After removing all the worker nodes in the cluster, SSH onto a controller node and run the
resetcommand to remove the node. -
Repeat the previous step on the remaining controller nodes in the cluster.
(Optional) Serve Installation Assets Using the Vendor API
To install with Embedded Cluster, you need to download the Embedded Cluster installer binary and a license. Air gap installations also require an air gap bundle. Some vendors already have a portal where their customers can log in to access documentation or download artifacts. In cases like this, you can serve the Embedded Cluster installation essets yourself using the Replicated Vendor API, rather than having customers download the assets from the Replicated app service using a curl command during installation.
To serve Embedded Cluster installation assets with the Vendor API:
-
If you have not done so already, create an API token for the Vendor API. See Use the Vendor API v3.
-
Call the Get an Embedded Cluster release endpoint to download the assets needed to install your application with Embedded Cluster. Your customers must take this binary and their license and copy them to the machine where they will install your application.
Note the following:
-
(Recommended) Provide the
customerIdquery parameter so that the customer’s license is included in the downloaded tarball. This mirrors what is returned when a customer downloads the binary directly using the Replicated app service and is the most useful option. Excluding thecustomerIdis useful if you plan to distribute the license separately. -
If you do not provide any query parameters, this endpoint downloads the Embedded Cluster binary for the latest release on the specified channel. You can provide the
channelSequencequery parameter to download the binary for a particular release.
-
Additional Use Cases
This section outlines some additional use cases for Embedded Cluster. These are not officially supported features from Replicated, but are ways of using Embedded Cluster that we or our customers have experimented with that might be useful to you.
NVIDIA GPU Operator
The NVIDIA GPU Operator uses the operator framework within Kubernetes to automate the management of all NVIDIA software components needed to provision GPUs. For more information about this operator, see the NVIDIA GPU Operator documentation.
You can include the NVIDIA GPU Operator in your release as an additional Helm chart, or using Embedded Cluster Helm extensions. For information about adding Helm extensions, see extensions in Embedded Cluster Config.
Using the NVIDIA GPU Operator with Embedded Cluster requires configuring the containerd options in the operator as follows:
# Embedded Cluster Config

  extensions:
    helm:
      repositories:
        - name: nvidia
          url: https://nvidia.github.io/gpu-operator
      charts:
        - name: gpu-operator
          chartname: nvidia/gpu-operator
          namespace: gpu-operator
          version: "v24.9.1"
          values: |
            # configure the containerd options
            toolkit:
             env:
             - name: CONTAINERD_CONFIG
               value: /etc/k0s/containerd.d/nvidia.toml
             - name: CONTAINERD_SOCKET
               value: /run/k0s/containerd.sock
When the containerd options are configured as shown above, the NVIDIA GPU Operator automatically creates the required configurations in the /etc/k0s/containerd.d/nvidia.toml file. It is not necessary to create this file manually, or modify any other configuration on the hosts.
If you include the NVIDIA GPU Operator as a Helm extension, remove any existing containerd services that are running on the host (such as those deployed by Docker) before attempting to install the release with Embedded Cluster. If there are any containerd services on the host, the NVIDIA GPU Operator will generate an invalid containerd config, causing the installation to fail. For more information, see Installation failure when NVIDIA GPU Operator is included as Helm extension in Troubleshooting Embedded Cluster.
This is the result of a known issue with v24.9.x of the NVIDIA GPU Operator. For more information about the known issue, see container-toolkit does not modify the containerd config correctly when there are multiple instances of the containerd binary in the nvidia-container-toolkit repository in GitHub.